

Introduction: Code-generated Patterns in Tinkercad


This has been written by the Tinkercad team at Autodesk as a teacher-led resource to support the 'Hour of Code™'. The Hour of Code is a nationwide initiative by Computer Science Education Week [csedweek.org] and Code.org [code.org] to introduce millions of students to one hour of computer science and computer programming. The 2019 Computer Science Education Week will be December 9-15, but you can host an Hour of Code all year-round.
Recommended grades: 3-5
Skills taught:
- Explain how order and variety work together to achieve pattern
- Create a computer program that includes a loop
- Modify, remix, or incorporate portions of an existing program into one's own work, to develop something new
- Describe choices made during program development using code comments
Lesson overview: How do order and chaos work together to form something beautiful? In what ways are patterns, repetition, and rhythm similar? How are they different? In this lesson, your students will explore all of these questions within the context of coding - while also making an awesome tea light holder or a shareable GIF at the same time!
In this lesson students will:
- Play with code in order to visualize how to make a pattern and to see what happens when randomness is applied to logic
- Construct knowledge about repetition, patterns, and rhythm and how one or more of these concepts relate to computer science and other STEAM areas of study
- Analyze and discuss an existing pattern that can be applied to making a real tea light holder or something else
- Combine CAD and code to make something cool they can share!
Estimated instructional time: 60 minutes
Materials: computers, internet, Tinkercad (a free, easy-to-use, web-based 3D CAD design tool); optional, but useful: 3D printer, color printouts of the Codeblocks used in this lesson or this images folder, as well as teacher notes (see Step 9), and this slideshow.
Step 1: Build Some Context Around Coding (Optional)

How can an architect, engineer, or computer scientist be like a painter or a poet? Making patterns is one thing they all have in common.
In math, finding patterns is extremely important. Patterns make tasks simpler, because problems are easier to solve when they share patterns. Once we recognize a pattern, we can then use the same problem-solving solution wherever that pattern exists.
In coding - like in math - patterns are made from ideas. Mathematicians and computer programmers use patterns to express themselves and to make their work more efficient. For example, they might use loops to allow for the repetition of a sequence of code multiple times.

Things to explore before the Hour of Code
The inspiration behind Hour of Code is to "demystify" computer science, to show that anybody can learn the basics, and to broaden participation in the field of computer science.
In launching this lesson, you might share this slide show, which includes images and definitions of key words like repetition, pattern, rhythm, loop, and variable.
Some educators choose to launch Hour of Code with their students by sharing a quick, inspirational video. Others front-load the hour by pre-teaching the context around coding during a lesson before the actual coding activity. Some schools or teams of teachers organize Hour of Code as a daylong (or even week long!) interdisciplinary activity.
The slideshow included in this lesson could be appropriate to discuss within the context of science, math, humanities, or art.
Depending on your students' familiarity with the Cartesian coordinate system, it might make sense to review this too before launching into Codeblocks. Even if they have used a block-based coding program like Scratch before, the Z axis could be a new (and exciting!) concept for them to learn.

At the end of the lesson, your students can record a GIF of their design or even 3D print a tea light holder that is decorated with the pattern they created with Codeblocks.
The most important part is that they share their computational thinking throughout the coding activity, and use this thinking as a way to extend their creativity through coding!
This lesson is aligned with the CSTA K-12 CS Standards and the ISTE Standards for Students.
Begin with the familiar
Teaching students about patterns is inherently fun and accessible, because patterns are everywhere. They can be found in nature or can be made by humans - they can be seen in flower petals, on shower heads, and as decorations in the home.
Because of repetition, patterns are usually easy to identify, but making a pattern - or even describing how it is made - requires a much deeper level of thinking.
And patterns are created in different ways, for example, in nature, patterns are often formed as a result of stress; while in building architecture, a "pattern" (like doors or windows) commonly evolves from the way people move through an environment. (Read more about this in the slideshow.)
Sometimes designers use patterns that were inspired by nature - like the honeycomb pattern, (which, in turn, originates in the habits of bees.) More about this here!

Ready to start coding in CAD?!
Are you completely new to Tinkercad Codeblocks? Check out this Quick Start Guide to learn everything you need to start teaching with Codeblocks. In addition, these Codeblocks starter activities are a great way for your students to get acclimated before embarking on the tea light design.
The next step launches into the coding part of this lesson. If you think you may need additional support in getting started with Tinkercad Codeblocks, skip down to Step 8 for some tips and more resources. Tip #1: Don't overthink it!
Even if you and your students only make it through the next step during the first hour, it's okay as long as everyone had fun and learned something new. There are so many more hours to code and CAD together!
Step 2: Give Students Some Code to Play With

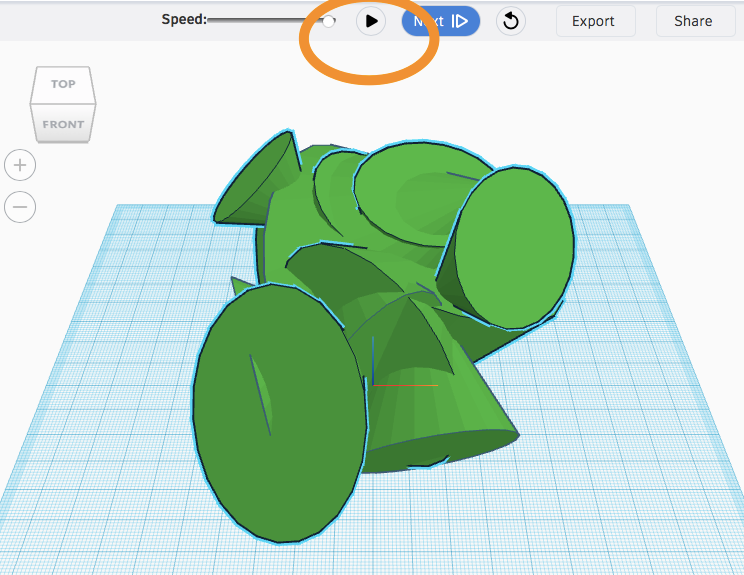
There's nothing students love more than making a mess. (This is fun for adults too. Case in point: The amusing fireworks display of weirdness below... try to stop watching it.)

After you have discussed with students about the concept of patterns and how they are used, invite them to dive right into using Codeblocks in Tinkercad.
Once they are logged in, they can visit the Codeblocks workspace by scrolling down and clicking "Create your first Codeblocks design."

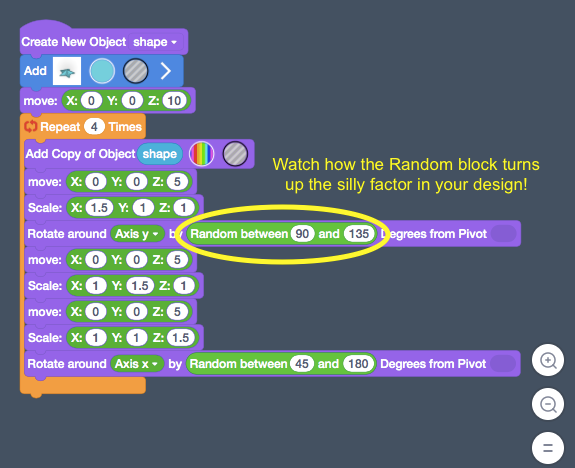
When they are inside the Codeblocks editor, they can copy the script below to make a crazy, random shape generator. (All of the Codeblocks scripts referenced in this lesson are included as a printable PDF at the end of the lesson, as well as in a shared folder of images.)
Provide a bit of guidance and structure
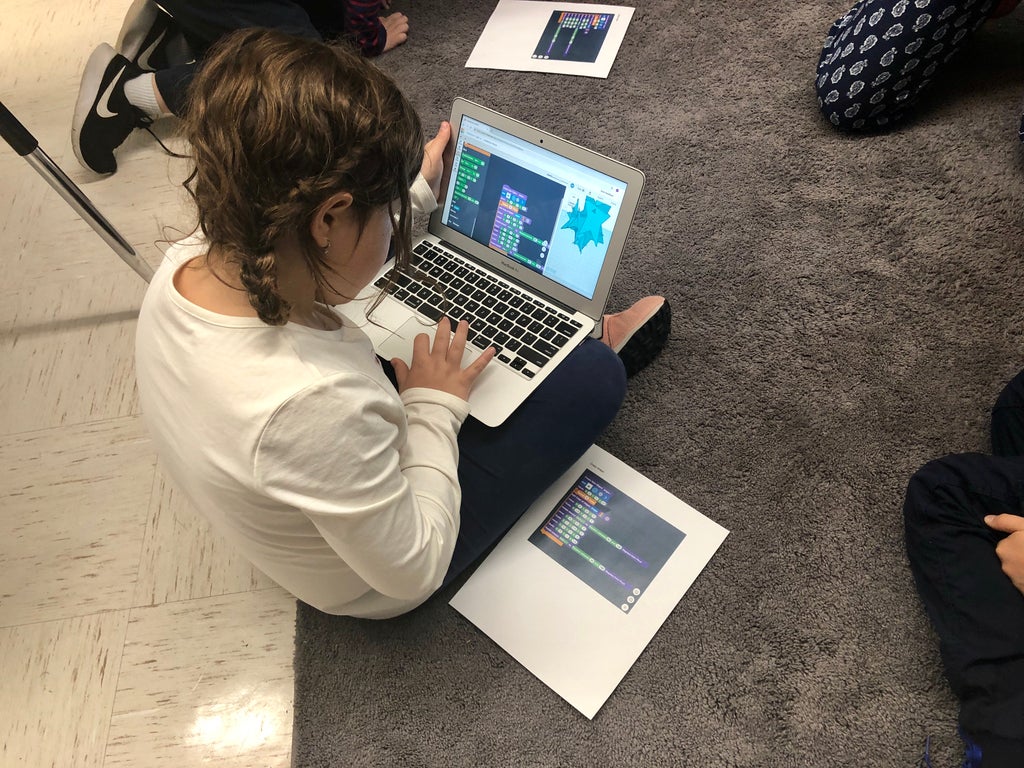
It may be best to have students work in pairs as they explore Codeblocks for the first time, so that they can check each other's mistakes and talk about what they are noticing each block is doing. (This also means fewer questions for you to answer as you are learning yourself!)
Some pointers for you:
- One thing students might find tricky about copying the scripts from the images is that once one of the Shapes is added to a script, the word "Add" appears, as well as settings for changing the color or turning the shape into a Hole.
- If you are printing the scripts on paper, using color ink is best. If that is not an option, you might just share the link to the folder of images of the Codeblocks scripts with students and have one student in the pair keep the scripts open on one laptop, while they use another to code. If there isn't one laptop per student, it is also possible to adjust the windows so that both Tinkercad and the image file are open at the same time.
- Please do not use this Instructable as your primary source for the Codeblocks scripts! Please do use the images folder or the printable PDF at the end of this lesson - this will make coding MUCH easier!
- Encourage students to give a name to each new Object they create. They should also do this with the Variables that are preset to 'item.' Not only is this a good organizational skill that is important in CAD, it also makes plugging Data into Codeblocks much easier.
Once they have placed all 13 blocks in this arrangement, tell them to run the program by hitting the play button.
After they run it once, they should run it again. They should notice a difference due to the Random blocks.
Students can then turn and talk about what they are noticing and make guesses using language such as: repetition, pattern, and rhythm.
Following the first turn-and-talk, encourage students to play with the Codeblocks by switching out the blue star shape (or whatever shape they started with) for a different shape.
Need some music to set the mood? It's fun to think about the math behind music like jazz. Maybe students will make connections between the sounds they are hearing and what they are making in code.
Assessment and sharing
Encourage students to modify and remix the Codeblocks - and tell them not to worry if something breaks! They can always fix it. Their designs will also be saved in their Tinkercad accounts in case they want to return to them for more tinkering.
You might circulate the room and ask students questions as a means of formative assessment. The most important part is that they have the chance to play, imagine, design, and share their thinking.
Depending on your students' age level, familiarity with block-based coding, and engagement in the activity, you may extend this exploration and hold off on the following steps until the next lesson.
In order to check for understanding at the end of the lesson, you could have students add comments to their Codeblocks that explain their theories about what the blocks in the existing design are doing, and their choices in modifying the program. They could also record a GIF of their design to share their work. See Steps 3 and 7 for more info on this.
Step 3: Build a Shape and Explain What the Code Is Doing
After students have reveled in the controlled chaos of the last Codeblocks script, it is time to rein things in by creating some order!
Because the process of developing a design in code is more linear and sequential, it requires a different type of thinking than students may be used to in navigating Tinkercad's original 3D modeling environment. As a result, students will be flexing their brains to be more deliberate in their design choices and more abstract in their thought processes.
It's important to emphasize that changing it up is a good thing, and that coding is an activity that can be interesting, creative, and rewarding for all types of thinkers.
Choosing a shape
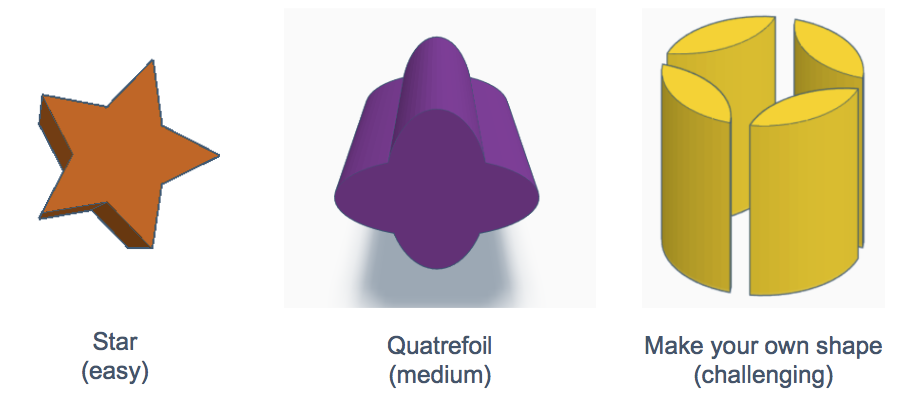
The first step is for students to choose a shape they would like to use for their pattern. The PDF and images folder at the end of this lesson includes Codeblocks scripts for making patterns with a star and a quatrefoil shape.
You might also challenge students to replicate the complex shape featured at the beginning of this step for use in their pattern, or to create their own.
Using code comments
As your students are building their first shape by following the provided Codeblocks script (or modifying it by making their own shape,) they should use the Step button (next to the Play button) to analyze what each individual block is doing. They should also document their thinking by adding comment codes, similar to what's pictured below.
The Comment block can be found in the Markup section of the Codeblocks panel.
Encourage students to add comments for at least this first script.

Step 4: Make a Circular Pattern

Once students have their first shape in place, they are ready to begin building their circular pattern, which will form the base for the overall pattern. In making this pattern, your students will be using both a loop and variable.
Before embarking upon this pivotal moment (pun completely intended,) you might show the GIF at the top of this step to students to provide a bit of guidance in understanding how making a circular pattern in code works. It is also included in the slideshow.
To learn more about 3D modeling concepts from Deanne Bell, a mechanical engineer, watch the full video created by the program she founded, Future Engineers.
Depending on the enjoyment level that you are sensing from students in your request that they write code comments to explain what is happening during each Step of the design, you might loosen up with the block-by-block directive and just ask that they write at least one comment at the end of the script to show their thinking about how circular patterns are made. (HINT: Hour of Code is supposed to be fun.)
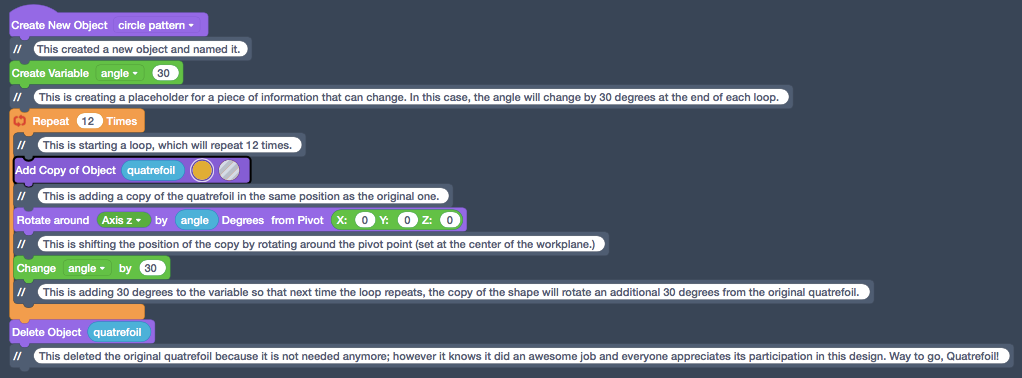
Because we find writing block-by-block code commentary absolutely enthralling, we have provided a handy cheat sheet for you above. The Codeblocks scripts PDF and image folder at the end of this lesson includes the script without the comments, for you to share with your students. (Psst... there is also a cheat sheet for you to download.)
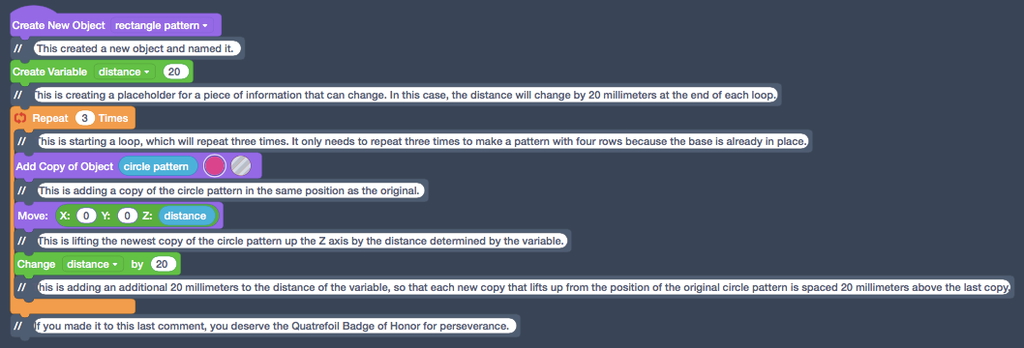
Step 5: Get Rectangular!

Ready to level up? The next step is for your students to create a rectangular pattern of four rows of the circle shape. Things are really shaping up quickly now, so it might make sense to pause for a moment and watch the second GIF (above) featuring Deanne Bell illustrating how a rectangular pattern works.
Changing colors or making the copy of Objects into Holes is really helpful in trying to decompose what's happening.
We have also included the code comments below.
Shake up your assessment a bit
Are your kinesthetic learners getting wiggly? You might launch a quick, unplugged break, in which students can demonstrate their thinking about how patterns are made by getting up and moving. Turn up the volume on this challenge by staging a Circle versus Rectangle patterns dance-off!
Step 6: Add the Pattern to a Tea Light Holder


So your students have expertly blended code and CAD into beautiful patterns they want to share with the world. How can they make it real? One way to do this is to add their patterns to a tea light holder that could be 3D printed. The instructions for doing this are below.
If students got creative with the shapes they used in their pattern, they might need to make some adjustments to their design in order for the pattern to fit properly; but if they used the star or quatrefoil shape, they should be good to go!
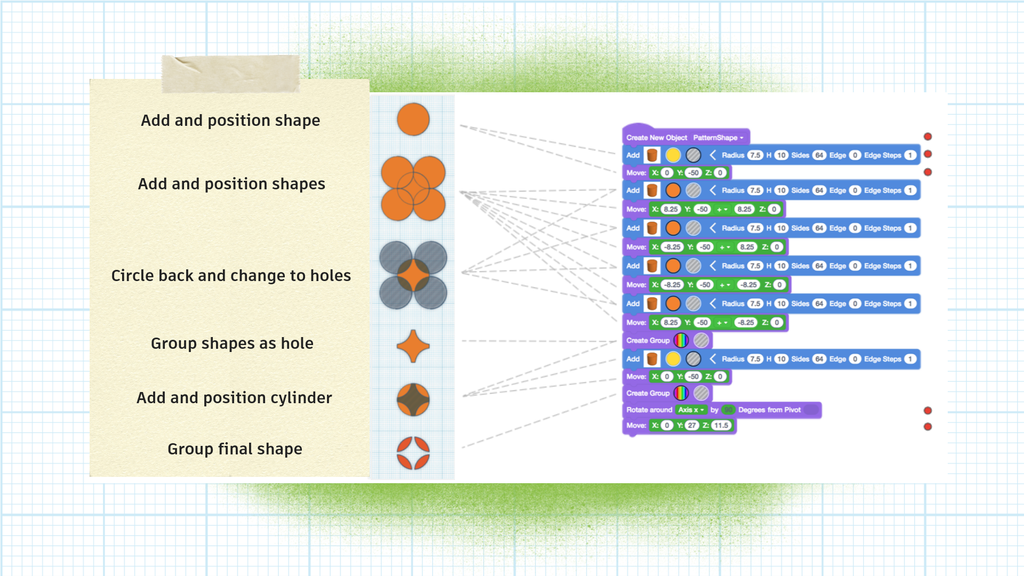
Also make sure your students change their circle and rectangle patterns to holes before they add them to the tea light. Here are all the scripts together... (PRO TIP: They are much easier to read and follow in the images folder and PDF linked at the end!)


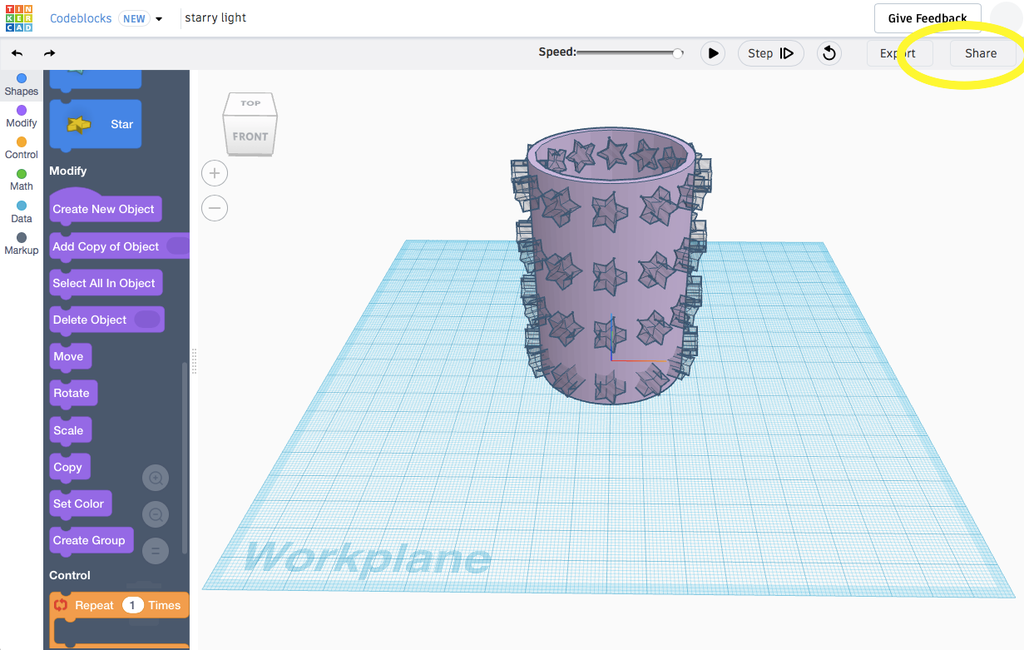
Step 7: Create a GIF

For more instant gratification, your students could also make GIF recordings of their Code-CAD creations. This can be done inside the Tinkercad editor by hitting the Share button and then choosing to "Save Gif" in the next screen. Make sure you run it first in the editor. (Note: It takes a few minutes for your GIF to package and download. Totally worth the wait!)
Here's how...
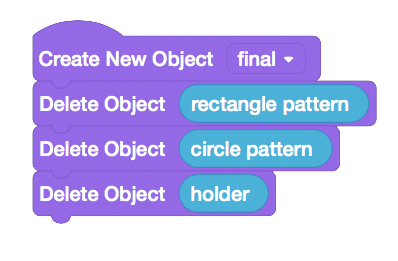
Be sure to remind students to add this script to the end of their program before they make a GIF, so that everything groups properly...
Students could also communicate what they learned with you during Hour of Code by adding a message block at the end of their program.
As their proud teacher, you might also ask permission to share some of their work yourself - in the spirit of "demystifying coding." (If you post on social channels, please tag us @tinkercad, so we can rejoice with you! It's our first Hour of Code too!!!)
Step 8: Getting Started With Tinkercad Codeblocks

If this is your first time teaching a project that integrates CAD and code, here are a couple helpful resources to get you started:
- Visit the Tinkercad Codeblocks page
- Read this blog post: Official Guide to Tinkercad Codeblocks
- Explore the Codeblocks Hub
- Don't overthink it!
And for more information on managing your classroom for making, how to assess a 3D design project, and more, please check out: How to Bring Tinkercad into Your Classroom.
Step 9: Celebrate!

Yay! You did it. Or maybe you haven't yet, but you're here to get all the resources you need to make Hour of Code awesome for your students.
At the end of this step are PDFs you can print for the Codeblocks scripts we used, teaching notes, and a certificate for your students!
And here is a link to the folder with images for all of the Codeblocks scripts from this lesson: Codeblocks Images
Also, don't forget about the slideshow.
After your celebration is over, please stop by again and let us know how it went by leaving a comment or sharing your students' creations.


