

Introduction: Rat Rod Mower Kart


This is all about my process of building a rat rod go kart from an old lawn mower. As with any good rat rod build, it is mostly assembled from salvaged parts. The end-goal for this project is to give it to my wife for her birthday Memorial day weekend so she can drive it in the Tractor Days Parade on the island she delivers mail for.
Donor mower details are:
2009-2014 Cub Cadet LTX1040
19 HP single-cylinder Kohler Courage Engine
Belt-driven CVT transmission
The cutting deck was toast, and it hadn't been run in several years.
The engine didn't run when I got it, but it was in "ran when it was parked" condition. After a few simple tests and checks, I determined it was probably just a stuck carburetor. I ordered the part off Amazon and got started while I waited for it to arrive.
Step 1: Tear Down


Tear down usually goes pretty quick on a project like this and helps motivation, because it looks like you got so much done.
It was really only an hour or two of taking of parts and sorting them into two piles: metal-recycle and maybe-useful.
I want this thing low and rodded out. The original plan was to cut it in half, flip the rear axle, and stretch it in the middle of the frame. After looking for replacement drive belts, I found I would have to install a jackshaft or idler pulley set because they just don't make belts long enough for what I wanted to do. Lowering it too much also would hinder my wife's ability to drive it around the farm and actually use the thing. As cool as slammed to the ground would be, it just wasn't practical.
Plan B...
I cut down the sheet metal deck that used to support the seat and battery. I could at least lower the seat as far as possible and lengthen and drop it in front of the motor. "Raked" is a close second to "slammed".
Step 2: Wheel Barrow Seat and Cutting the Frame


One main goal of this project was to use an old wheel barrow as the seat/body of the kart. To do it, I knew I wanted to cut the wheel barrow in such a way that I can use the deep end of it as a seat with a high back, and the shallow end as the dashboard. When done right, I think it really looks like an old T-Bucket hot rod.
The seat was mounted using the old seat hinge with new holes drilled in it. I grabbed some scrap 1/8" sheet metal to bend up little spring pads. I welded them directly to the frame and bolted the springs under the seat for a little cushion while driving.
At this point, I "knew" that I wanted to build a little truck bed behind the barrow to make it look like a T-bucket pickup. But, the best laid plans of mice and men often go awry. Because of the hinged barrow seat and the way the bed would cover the tow hitch, I had to make some new plans. So I picked up an old mailbox from my parents, who had recently replaced theirs. My wife is a rural mail carrier, so the mail box certainly fits an emerging theme for the build. More on that later...
Using a Dewalt Reciprocating saw, I cut the frame just in front of the motor mounts. The steering would have to be lengthened or changed, but lengthening the frame here would have almost no other effects on major components of the kart. I also cut off the frame pieces that stuck out past the front axle; they were just there to hold the cowling and exhaust, and we don't need those where we're going. Plus, rat rod axles are supposed to be in the very front.
After cutting the frame apart, I had to mock it up with a couple tire sizes and frame lengths to see how it looked best.
I really wanted to use the smaller tires, but, again, not very practical. Bigger tires roll over objects better and can eat up any imperfections in the steering setup.
It also just so happened that a friend of mine had a large quantity of old mower parts laying around from his time racing lawnmowers. (I swear its a real thing. https://www.youtube.com/watch?v=t1ljXIW7n-I ) He supplied me with some scrap parts: new front tires and tie rods for the new steering to be designed later.
Step 3: Welding It Back Together


Originally I thought I would bend some pipe that we had leftover from a project at work to get the perfect angle for the front axle. However, with the carburetor and big air filter on the engine, there just wasn't room for a bent pipe on that side. Instead, I had to compromise again and flip the frame section that houses the axle and install it upside down with a straight pipe. It actually worked out much simpler.
I extended the frame 12". This was the minimum I needed to lengthen it for the tire to clear the air filter at full turn.
I cut my pipe (1" sch40) frame extensions at 20". I'd have 2.75" of weld area on the front section with the axle (as much as my design would allow), and 5.25" on the engine-side. I bent the frame around the pipe as much as possible and welded in as many spots as I could get the stinger into.
The tire at full turn would just clear the air filter. The filter isn't in the best spot for keeping clean, but sometimes fashion trumps function.
To make the steering fit, I had to lower the front end another inch and flip the steering arm to bias towards the rear of the mower.
Step 4: "Body" Panels


The dashboard is made from the cut off section of the barrow. The supports for it are made from some 1/4" stainless round bar we had a lot of scraps of at work. It sits higher than the original plan, because it allows access to the engine and flywheel. The supports are welded directly to the frame of the mower. It's not ideal if I need to pull the engine for a rebuild or replacement in the future, but they're surprisingly flexible in case they need to be bent out of the way.
The grill is made from an old pitchfork. I marked and notched where the tines touched the front steering support and welded each tine in place. I originally planned to cut the pitchfork down, but, frankly, I think it looks pretty cool long, so I left it. You can't go back if it doesn't look good cut down, after all.
Step 5: Fuel Tank


One of the staples of a rat rod is the fuel tank. I knew I wanted to do something unique. A mini keg? Stainless beer growler? Hide it in a mailbox? I really wanted an old square one gallon gas or oil can. Turns out one of those was surprisingly hard to find. I compromised with a dented and rusty paint thinner can I had. It had a great patina, and I think it matched the rust and chipped paint of the barrow really well.
So I picked up a shutoff valve complete with gasket on Amazon:
https://www.amazon.com/Highfine-Generator-Valve-28...
Installing the valve is as simple as drilling the right sized hole in the bottom of the can and bolting the valve into place. There are two VERY important parts of properly executing this task: 1) using a Nylock nut because you do not want that nut backing itself off and spilling gas everywhere; 2) place the hole in a location you can access with a deep socket and long extension through the filler hole. And in my case, there's actually a third lesson learned: don't use a can with a hole in it.
As it turns out, the rusted gallon jug with a dent in it also had a leak right in the middle of the dent. Can't win em all...
So I had to use a rather new-looking paint thinner can. Hopefully it'll pick up some rust soon enough...
Step 6: Steering


I had to redesign my steering a bit, because the oversized air filter I installed interfered with the original steering linkage on one side.
I used a track rod to tie the steering arms together behind the front axle. I really wanted to install a steering box and drag link, but it's just not very cost-efficient. Instead, I used the original geared steering hub. In this design, the steering wheel turns a geared shaft, which turns a hub with two tie rod ends on it. It had independent drag links for each side, and they were really loose so the wheels didn't track together very well. Independent drag links can also cause unintended steering problems if the front axle articulates. Installing a quality track rod definitely helped to keep the tires parallel and more easily adjustable for toe in/out.
The downside of using the old steering arms for the track rod is that it left me no place to attach the new drag link. I pulled off the spindle and welded on a new steering arm made from some scrap 3/16" stainless that was laying around the shop. It took a bit of trial and error and grinding to find a shape that wouldn't interfere with the axle or tire at full turn / full articulation.
The new drag link was going to be made from some square stainless tubing I had, but I noticed the old drag link threads looked really similar to the threads on one of the tie rod arms I had gotten from my mower-racing friend. Sure enough, it was a perfect fit, so my new drag link was as simple as threading an old drag link onto an old tie rod!
You may notice in the photos that all the bolts/nuts on the steering look upside down. One of the tricks of industry is to install important bolts upside down so you can more easily monitor them - If a nut loosens or falls off completely, you won't notice it if the bolt is still in place; but if the bolt loosens, you will notice the exposed nut threads immediately.
I didn't like the near-vertical steering shaft. So I welded in some bracing (leftover from the old gas tank mount), and cut up a C-clamp to make an adjustable angled steering shaft. The articulating joint is a 3/8" universal socket joint that I welded into the steering shaft. There's a little bit of slop from the C-clamp's pad, but it's not noticeable when you're driving it.
Step 7: Seat Cushion


My mom made a padded seat for the rat mower from some new fabric and old pillows and sleeping pad foam.
I made a template for her with heavy paper, and we discussed material/print options. She chose some outdoor upholstery material. She sewed it in a couple stages so I could test fit the seat without bringing the mower to her. There are some Neodymium magnets from Amazon taped to the inside of the cushion. They work surprisingly well to keep the seat in place.
Step 8: Custom Touches


The factory air filter doesn't look cool. So I 3d-printed an adapter for the carburetor so I could put a "massive" 3" cone filter on it.
Link to the STL file on Thingiverse: https://www.thingiverse.com/thing:3559841
Any good rat rod has a comically tall shifter. So, I've extended the shift arm by 24 inches with 3/8" rod and added a custom 3D printed mailbox shift knob. It features a paperclip hinge and fully functional door.
I also 3d-printed a switch box to mount on the dash in lieu of using the keyed switch. There wasn't anything wrong with the switch, but it had too many mower safeties that didn't apply to a go kart, and it really didn't match the feng shui of the build.
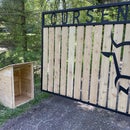
Step 9: Battery Box and Trunk


In lieu of a truck bed, I decided to go with an old mailbox for a trunk.
I reused the old battery box and mounted it behind the barrow body. There wasn't much room for it between the kart frame and where I wanted to put the mailbox. I also wanted to keep it up high enough that I could use the original tow hitch for a future matching trailer project.
I welded the old battery box directly to the frame of the mower. It wasn't designed to support the weight of the battery the way that I mounted it, but I braced it with the mail box mount supports, so it shouldn't be a problem.
I used more of the leftover 1" sch40 pipe to create bracing for the battery box and the main support for the mailbox mount. I had to cut a relatively complicated double-miter on the round pipe, which can be a real pain. I used an Evolution miter saw. This saw can cut most materials, and the miter function made it really easy to make a cut that would otherwise be a nightmare. https://www.amazon.com/Evolution-Power-Tools-R255S...
I left the pipe sections long so I could cut them to fit the mailbox mount once they were in place. Sometimes it's just so hard to visualize how long a piece needs to be to get the perfect "look."
The mailbox mount is made from 1/8" steel plate, and bent on the brake press with a 60 degree die.
I braced the cut up sheet metal that used to be the frame of the mower with some 3/16" stainless. It's overkill, but I work at a stainless shop, so it's the most plentiful scrap I've got access to.
Step 10: Test Running


After weeks and weeks of working on this thing after work and on the weekends, it was finally time to test it out in the parking lot. I hadn't completed the steering, shifter, and a couple little things when it came time for a test run. This was actually the first time I'd get to see if the motor runs! I had replaced the carburetor, but I didn't have a battery or electrical hooked up, so I hadn't been able to test it yet. Luckily, everything worked exactly it should. It fired right up! Top speed was a little slow, so I'll have to replace a pulley or two with a different size to gain some mechanical advantage.
It definitely drew the attention of the other businesses in our industrial park! There will be some improvements in the future, but for now, it's pretty hard to believe it used to be a lawnmower destined for the scrap yard!

Grand Prize in the
Trash to Treasure


