

Introduction: Simple Rail-Clamped Planter Box


As new homeowners (read: people with a place to live but not a lot of stuff to fill it), we're always looking for little things to bring some vitality to our home. We really love the space of our little front porch, but we needed something to make it inviting and pleasant. We want to make our porch a place to be, not just an area at the front of our house, especially since winter is finally over! So we decided we wanted some little planty-thingies! And we want to hold these little planty-thingies off the front of our rails to announce to the world that A) people actually live in this house, and B) winter is indeed totally over for them.
Step 1: Design!
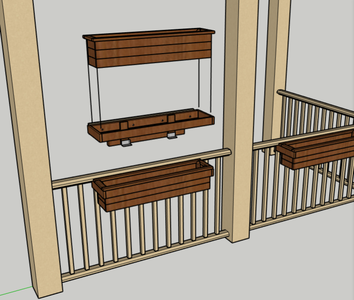


This build has two main components: the Box and the Support Cradle.
The Box is just a box. Well, we did design it to have a little internal drain in it so that water isn't trapped, so there's that. We researched the plant material we wanted and made sure that the inside volume would accommodate them. 6"x6"x36" was plenty for us, but you can make yours bigger because you're grown and can do what you want. (Actually, I say that, but gravity may have something to say about that if you get too aggressive. Remember that soil can weigh between 75-110 lbs per cubit foot, so if you go crazy, well... use your imagination.)
The Support Cradle is a little more complicated, and its construction will depend on your specific railing onto which you wish to mount the Box. Take some measurements of your existing railing to determine the appropriate Dimensions given in the diagrams. You'll need these as we move forward. You're certainly welcome to make some of these Dimensions whatever you want, while others will be based strictly on what the existing conditions are.
Because the edges on our top rail are beveled, we couldn’t really hang a traditional bracket from the rail without leaving weird little triangular gaps. No thanks. So we opted for a Support Cradle design that would clamp on the balusters, using friction for support, and would hold the Box so that it can slide in and out. That meant that we needed to know the thickness of the balusters from front-to-back, because that dimension (Dimension E) was going to be the middle of our clamp “sandwich.”
The point is that the more dimensional information you know about where this is going (your “build site”), the better. Dimensions A-E shown here are what we needed in order to build our box. Your dimensions may be slightly different than ours based on your site conditions, but whatever your values are, the variables will still work.
SOME NOTES ON MATERIALS:
Here's our thought process on deciding what to make this out of:
First, it needs to be cheap affordable because we like to buy food from time to time. Also, we wanted a natural look and something that was relatively easy to work with. Sooo…wood. Ok, what kind of wood? Well, it’s going outside and will be holding moist soil and plants that need water, so it needs to be weather-resistant. Oh, also it needs to be cheap. That leaves us with only a couple options: Cedar or pressure-treated pine.
OH, WAIT – we also wanted to grow some edible herbs in these, so PT pine was out due to the danger of chemicals from the wood leaching into the soil. We don’t want our cilantro fortified with arsenic. (Yes, we know that most modern treatments don’t contain arsenic, but some do contain other substances used in disinfectants, and unless you’re willing to do the research on what specifically your store is selling, it’s just not worth it for this project.) Also, any stain and sealer for untreated pine was bound to have some gross stuff as well. So that left us with cedar. But cedar is a little pricey… is there any way we can use untreated (cheaper) pine and protect it another way?
We found that there are several natural wood sealers out there, but again, they cost more than we want them to. However, what doesn’t cost a lot is plastic sheeting, so we decided that we’d be ok with sealing untreated pine with an exterior urethane and then lining the entire inside with plastic to keep the soil from ever touching the wood. This would also allow us to stain the wood any color we liked prior to sealing. Yay colors.
SO, to recap, the final options were:
A) Use cedar (too expensive for us)
B) Use Pressure Treated Pine lined with plastic sheeting to protect the soil (possibly more difficult to stain, may not have the stock board shapes we wanted)
C) Use natural wood sealer (too expensive for us)
D) Use untreated Pine with sealer and plastic sheeting (little more work, but gives us maximum design flexibility and relatively inexpensive)
The choice for us really came down to A or D, and we chose D based on flexibility and economics.
NOTE: If you decide that you have a few extra bucks to spend on cedar, you can totally use the same building steps we’ll be outlining! Except you won’t have to do any of the staining, sealing, lining, etc,. which is definitely a plus. Also cedar is a beautiful species.
Step 2: Test!

Something that’s generally best practice with these things is to build some kind of mock-up so you can test the real-like geometries. So we made a little box out of cardboard that was roughly the size of what we thought was right, and hung it on the rail to test. As it turned out, we discovered that our original design was kind of out of proportion, so we reduced the height by about an inch or so for the actual build.
Step 3: Tools and Materials


Our design meant that we needed the following items:
Dimensional Lumber
2x3 x 8’ _ One (1)
1x4 x 8’ _ One (1)
1x3x 8’ _ Five (5)
1x2 x 8’ _ Two (2)
Fasteners
1-1/4” Coarse Thread Drywall Screws (black pref) _ 1 lb box
1-5/8” Trim-head screws (black pref) _ 1 lb box
Staples (for staple gun or stapler)
¼” x 4” GALVANIZED Carriage Bolts _ Four (4) ** Based on Dimension E = 1-1/4 inch. Add or subtract from there based on your Dimension E**
¼” GALV. Nuts _ Four (4)
¼” GALV. Washers_ Four (4)
Misc. Hardware
1-1/2” x 2” GALVANIZED 18 ga. Steel Angle (similar to Simpson Strong-tie) _ Two (2)
All-purpose Cotton Clothesline (or other rope of your choice) _ Six Feet (6’)
4-mil Plastic Sheeting, 36” wide _ 6 Feet (6’) min.
Finishes (If you’re planning to stain and seal)
Pre-stain wood conditioner (we used Varathane oil-based). Pre-stain conditioner isn’t required, but it definitely makes staining much easier! No blotches! The 8oz size was more than enough and we did two boxes.
Wood stain of your choosing. I had several samples on-hand so I did a test of each (pic below). We went with Provincial. Again, the 8oz size was plenty.
Polyurethane (we used Varathane Ultimate Spar Urethane Oil Based Exterior Spray). 1 (one) 11.25oz bottle is enough for one box.
Paint to match your railing (optional)
A few leftover cuts of lumber from your box if you’re testing stains/paints
TOOLS
Tape Measure
Pencil
Knife
Scissors
Speed Square
Bar clamps
Circular saw (or any type of saw that makes clean, straight cuts)
Drill / Driver
Countersink Drill bit
5/16” Drill bit
#1 square head driver bit
Philips head driver bit
7/16” wrench or small crescent wrench
Staple gun / Stapler
Safety glasses
Gloves
Small screwdriver / prybar
Rag
Paintbrush
Radio / speakers for music
Snacks
Step 4: Box 1- Base


Verify that your Dimension A is still correct, and use that dimension to mark and cut your first 1x3. Continue to cut Dimension A pieces out of 1x3’s until you have 6 total. Then, cut 6 pieces of 6 3/8” 1x3’s. Take care to ensure these are good, clean 90 degree cuts.
Now, look at each wood piece and decide which faces are the prettiest and rank them in the following categories and mark them:
1 (prettiest) – Front outside faces (3 boards)
2 – Back outside faces (3 boards)
3 – Inside faces
Then decide which one will be on the bottom and which will be on the top, remembering that the top piece will mostly be hidden behind the ring of the support bracket.
Now that you’ve decided which piece goes where and faces which way, take the bottom pieces and stack them together on their ends to form a rectangle. Put the side pieces so that their outside faces align with the ends of the front and back boards.
Next, drill two pilot holes using a countersink drill bit into the face of the back board where it intersects the side boards. These are VERY important because since we’re so close to the end of the board, without these pilot holes a screw will split the end of the back board, making it useless. Make sure the holes are centered on the side board and are about ½” or so from the top or bottom of the back board. Don’t make the countersink (larger cone) portion of the pilot holes too deep for these, since we will be using smaller trim head screws.
Once the pilot holes are in, switch bits (or drills) to the small square head bit and drive in the trim head screws to attach the sides to the back. Make sure that the top and bottom faces of the back and side boards are flush with each other while attaching them.
OK, so now you have a “C” shape. Now you want to measure the inside dimension of the shape, and use that dimension to cut what will be the bottom boards of the box. This will be a 1x4 piece and a 1x3 piece.
Once you have those two pieces cut, you can attach the back bottom piece (1x4) to the back face and side pieces. I would advise angling this piece so that the inside edge is flush with the bottom of the side faces of the box and the outside edge is ½” or so above the bottom. Think of this as what it is – an internal drain to the center of the box. Attach this piece using the pilot hole and trim head screw method, with two screws in each side, and 5 or so along the front face.
Next, attach the front face piece to the “C” shape to complete the rectangle. Attach the same as you did the back face piece. Then, attach the front bottom piece (1x3) the same as you did the back bottom piece. Again, angling this is recommended. Make sure to leave a gap in between the bottom back and the bottom front in order to drain! Stick keys or other thin piece of metal or something in the gap if you need a surface to push on in order to make the back bottom and back face flush with each other will driving.
Now you have the first rung of your box!
Step 5: Box 2 - Posting Up


Right then. Now we need to cut thecorner posts that will support the sides of the box as we go up. Stack the rest of the side boards up along one side of the box and add another board on its side, then measure from the top of the bottom board to the top of top board. This dimension (which should be between 7” and 7 ½” depending on the angle of the bottom board) will be what the corner posts ought to be cut to. The corner posts for this design will be cut out of the little 1x2 strips.
I wanted to get a little fancy with ours and miter the ends so that they taper to the top. To do that, I adjusted the angle of the saw to 45 degrees and cut the board so that the top of the point was at the measured number. If you’re a beginner and are not comfortable cutting at an angle yet, not worries, this is totally just an aesthetic thing. If you’re a beginner+ and want to try but are worried you’ll get the cut wrong, all you have to do is add an inch or so, cut the angle first, then go back and measure from the point backwards and make a straight cut for the bottom.
Once you’ve cut 4 of these, bring them over to your box and attach them to the bottom side pieces. Do this using the countersink method, only this time go a little further with the countersink, since we’ll be using the 1-¼” drywall screws here. These screws have much larger heads and can/will split end grains when driven. Put 1 screw in each of the corner posts to attach them to the side pieces. Be careful of not getting too close to the top of the side pieces, or the screw may split those as well.
Step 6: Box 3 - Coming Up the Sides


OK! Now that your posts are in place, it’s time to attach the face pieces! Start with the side pieces. Take your speed square, and stack them up the side so that the ends are perfectly square with the bottom. Once they’re good, clamp them tight to the bottom.
Now take your other clamp, and clamp the top of the corner post so that it aligns with the ends of the side pieces. Once that’s all tight, attach the side pieces to the corner post the same way you attached the corner post to the bottom piece. Put two screws in the middle piece but only one at the top.
Repeat this for all four corner posts.
Now you’re ready to put the front and back face pieces on! Use the same system of squaring and clamping as the sides, except instead of 1-1/4” drywall screws, we’ll use trim head screws to attach the face boards NOT to the corner posts, but to the side boards themselves. So go lighter on the countersink, and keep an eye on centering your pilot holes on the side board beyond. 2 screws per side per board. Also, make sure that the face of the side boards are flush with the recently squared ends of the face boards. You may have to use a little force (like I did) in order to get them to stay flush while you’re driving in the screws.
Do the same for both front and back, and you’ll be all set for the top trim!
Step 7: Box 4 - Top Trim


Almost done with the box! The last step is to attach the top trim pieces. We’ll be using the little 1x2 strips for this, so you’re just a few little cuts away!
For our design, we’ll want the front and back trim pieces to overlap the sides, so we need to put the sides on first. The best way to get the correct side dimension will be to hold your long 1x2 flat against the top of the side face, aligning the end with the end of one of the corner posts. From there, just mark the intersection of the trim piece with the other corner post. This cuts out having to use a tape measure and removes any chance of mis-remembering a dimension. Cut this piece, then do the same for the other side.
After they’re cut, attach them to the top of the side boards using small pilot holes and trim-head screws.
Then, to get the length of the back piece, hold the remaining length of 1x2 flat against the top of the back, aligning one end with the outside edge of the newly attached side trim piece, and mark the other end of the 1x2. Cut there, then do the same for the front.
Attach these the same way you attached the side trim pieces. You can use your clamps to hold them in place while you drill and drive. I used 5 screws per piece, and I used the inside face of the corner posts as guides to where along the length I should put the end screws.
At this point, you should feel good about yourself! You’ve created, on your own, the framework for a little ecosystem! Take a step back and enjoy how it feels to have exercised your agency over matter and bent it to your desires. Once there was no box. Now, because of you, there is. Well done. Now go get some snacks.
Step 8: Support Cradle 1 - Back and Front Clamp Bars


So remember your sheet of Field Measurements? Dimensions A –E and all of that? This is where these come in. First, cut your 1x4 to Dimension A. You can use the Box you made as a mark guide if you wish. This will be your Back Clamp Bar. (You may want to check this to make sure the the ends of that Bar will be flush with the outside edges of what will be your outer balusters.)
Next, add ¼” to your Dimension A, and cut your thicker 2x3 to that number. This will be your Front Clamp Bar. We’re cutting it longer to give the box some wiggle room to be lifted in and out when it’s placed in the Cradle. (This is a lesson learned, BTW.)
Now, use your actual bar clamps to clamp the Front Clamp Bar (the thicker 2x3) to the front of the existing railing running horizontally wherever you intend for the box to be mounted. Make sure it is positioned correctly vertically and horizontally. Remember, the box itself will be about the same length as the Front Clamp Bar, and the top lip of the box will be resting on the top of that Bar. For us, that position was the top of the existing railing in the center between columns (and since it was 1/4" wider than than Dimension A, it overhung the edges of the outer balusters by 1/8" or so on each side).
Once the Bar is being held in place, re-measure your B1-B4 Dimensions and write those measurements on the clamped Bar where each belong. Cut these sizes out of a 1x3 board so that you have little blocks that will fit between the balusters. These will be our Locking Cleats. You don’t have to cut one for every space, just every other or every third space, whatever works best for your condition to get the best symmetry. We’ll be centering our carriage bolts in these blocks here in a few minutes, so think about where you would like the bolt pattern to go. I’d recommend a bolt spacing of 16” or less, so make sure your Cleats are spaced so that their centers are 16” or less.
Another note on these Cleats is that you may want to cut them 1/16” to 1/8” shorter than what the B1-B4 dimension measures. This will allow them just a little room so as to not get wedged in between the balusters.
OK, now that they’re cut, attach the Cleats to the backside of the Front Clamp Bar so that they’re nested in the space between the balusters. Use a countersink drill bit and your 1-1/4” drywall screws to put one screw in each end left and right. Remember to leave the center clear for the carriage bolts that we’ll be inserting in the next couple steps.
Step 9: Support Cradle 2 - Lower Blocking Bar


Now we’re going to move on to the lower portion of the assembly. Re-measure your Dimension C, and cut the rest of your 2x3 to that dimension. This will be your Lower Blocking Bar. Clamp it to the front of the existing railing below the Front Clamp Bar.
Next, get Dimension F (which is the height of your Box below the top trim) and cut two 1x3 boards to that length. These will run vertically and connect the Front Clamp Bar to the Lower Blocking Bar. Use a speed square to align them so that the ends of the vertical boards are flush with the top of the Front Clamp Bar and the outer edges are aligned with the ends of the Lower Blocking Bar. Attach these boards to the Front Clamp Bar at the top first, using countersink bit and the drywall screws. Then reposition the Lower Blocking Bar so that the bottom of it is flush with the bottom end of the vertical pieces. Use a clamp to hold the Lower Bar in place, and attach it to the upper assembly by screwing through the vertical pieces into the Lower Bar.
Important note here: Only drill / drive one screw in each side to attach the Lower Bar right now! These screws should be near the top of the Lower Bar. This will give you room in the bottom to attach the Support Clips in the next step. Clearly, I wasn’t thinking about that when I did it, which is why the pictures show so many screws in the bottom the first time. I paid the price for that later… Best practice would actually be to hold up the metal angle brackets to the bottom of the board and mark where their screw holes are so that you can be sure to avoid them now.
Step 10: Support Cradle 3 - Support Clips


Alright, here’s another place where we learned a couple lessons. So while the pics still show the general idea, the exact method will be a little different in the description.
So take your galvanized angle brackets (hopefully you bought the ones given on the material list instead of the ones pictured, but if not it’s totally OK) and attach them to the face of your vertically running boards. Position them so that the bottom of the metal leg is flush with the bottom of the vertical board. Again, if you were like me and got hasty with the screws for the Lower Blocking Bar, you may have to reposition those screws now to accommodate the bracket. Also, the brackets shown are totally overkill. The smaller ones that we listed will do just fine. And they’re cheaper.
Step 11: Support Cradle 4 - Attach Back Clamp Bar


OK! Now it’s time to complete the railing attachment. The important thing to remember here is that you will need to be able to drill and insert the ¼” bolts through the Back Bar, Cleats, and Front Bar WITHOUT hitting the existing balusters OR with the hole ending up too close (less than ½”) to the edges of either the Front or Back Bar. Look through this whole step and do your best to have the holes more or less centered vertically on the Back Bar. But do not drill through the Back Bar first!
Instead, clamp the whole front assembly that you’ve made into position on the existing railing, if you haven’t already. Take your drill with the 5/16” drill bit (yes, it is slightly bigger than the bolt – that’s to allow a little wiggle room) and, starting from the back, drill through the center of the Cleats right between the screws. Before pulling the trigger, take care to ensure that the hole will be penetrating through both the Cleats and the Front Bar and, again, that there will be plenty of room (at least ½”) on both boards around the hole’s entry and exit. While drilling, be patient and make sure you are keeping the drill straight both vertically and horizontally as you go through both Cleat and Front Bar. Do this at all of your Cleats.
Now, using one clamp to hold the whole front assembly in position, use the other clamp to hold the Back Clamp Bar (that 1x4 that you cut in the beginning) in the correct position vertically and horizontally in relation with the Front Clamp Bar. This means more or less centered on the Front Clamp Bar, though your position may vary depending on how you want to mount your box. For us, that was making sure the Back Bar's ends aligned with the outside faces of the outer balusters of the existing railing, and making sure it’s top set flush with the bottom of our top existing rail.
Once you have the Back Clamp Bar held in place where you want it relative to the Front Bar, drill the 5/16” holes in the Back Bar by going backward through the holes you originally made in the Front Bar. This will ensure that the holes are perfectly aligned between the two sections. Again, keep the drill as straight as you can. Depending on your Dimension E and your drill bit, you may have to pull the bit further up on the drill’s chuck in order for it to penetrate all the way though both parts of assembly.
Now all you have to do is insert the bolts through the back, put on the washers and nuts on the front, and tighten them up using your wrench!
Don’t over-tighten, though! One way to know when you’re about to make things too tight is to watch the heads of the carriage bolts. As it’s being tightened, the square bit of the bolt’s head is supposed to dig into the wood to form a kind of lock, but if the round part is starting to dig in deeply and really crush the fibers, then you’re going too far.
Alright! Once all of your bolts are tightened down, release the clamps and see if it holds on its own!
Step 12: Support Cradle 5 - Complete Cradle Ring


We’re almost there! You have an assembly that will hold the weight of the Box sitting on the clips, but now we need to complete the ring so that the Box doesn’t just tip over.
The most important part of this step is to make sure that the clear opening inside the Ring is 1/4" wider in both directions than the main body of the Box itself (the main body being the portion below the top trim). Remember to factor in the vertical boards sticking out from the Bars! You can do this all by math or you can use the Box itself to verify.
The pictures show the second method of attaching the ring using the box as a guide, but you don’t really have to have the Box held in place the whole time in order to do this. In fact, you don’t even need to have the Clamp Assembly attached to the balusters in order to finish the ring; you can detach the Assembly from the existing railing do it on the ground if it’s more comfortable. That’s the beauty of this system.
Anyway, if you want to avoid math, go ahead and set the box in the Clamp Assembly so that it sits on the clips at the bottom and is centered in the Assembly. Clamp that in place so that it’s sitting straight up and down relative to the Assembly. Note that this means that you may either have to have it clamped loose or stuff some kind of shim (like folded paper or something) between the top of the box and the top of the vertical boards of the Clamp Assembly. This is because the clips and screws that attach the clips will push the bottom of the box out from the face of the vertical boards.
Now that everything is nice and plumb (straight up and down) and square (orthogonal left and right / front to back / side to side), hold a 1x3 board on the side of the box so that the end aligns with the back of the Front Clamp Bar and the top is flush with the top of that Bar. This should be right underneath the lip of the box. Now, make a mark on that 1x3 board right at the edge of the front lip of the box. DO NOT CUT HERE. Instead, what are we going to do? That’s right, class, we’re going to add ¼” to that dimension. Otherwise you’ll wind up like us on our first go and have a ring that’s too tight for the box to comfortably slide through.
So cut that piece to the correct mark (original mark + ¼”), and do the same thing for the other side. Next, go ahead and cut a length of 1x3 that’s ¼” longer than the front of the box below the lip (this should be Dimension A +1/4”, and it should be the same length as your Front Clamp Bar. These will be your Ring pieces. Also, Congratulations! Now you’re done with cutting!
Final three Ring pieces in hand, head back to the Assembly. Attach the shorter side pieces to the Front Bar using countersink and drywall screws, making sure that these side pieces are square with the Clamp Assembly / existing site rail.
Lastly, attach the longer front Ring piece in between the side Ring pieces using trim head screws. You probably know this by now, but make sure that the front face is flush with the ends of the side pieces.
Step 13: Support Cradle 6 - Final Test Fit and Sense of Accomplishment


Now the only thing left to do is to mount the completed Support Cradle to the existing site railing and test fit the box within it. Tighten everything down appropriately and make sure everything holds, and see if the box fits in snugly without being too tight to put in or take out. If the box is too tight, you may have to re-cut your Ring pieces a little longer. Trust me, it’s better to do this now than later.
There it is. Look at it. YOU made this. And it’s pretty cool. You made something cool. Snack time.
Step 14: Finish 1 - Choices, Choices...

Since we don't yet have the same Earth-awareness of Pocahontas, our color palate is limited to painting / staining with all the colors of Minwax. We had several test stains left over from a previous project, so we used some scraps to see what they would look like onsite.
If you feel like purchasing several colors to try out, test the different stains on leftover pieces from the box. We found it really helpful to place the samples on our railing to get an idea of how the colors would look in context. We were surprised at which one we liked the best in place with the whole context, because it was different than what we liked just by itself.
Step 15: Finish 2 - Sand Stain Seal


Take the Cradle off of the rail and detach the support clips for now.
Give the Box and Cradle a good sanding with a sandpaper block. You don't have to go crazy - just ease the edges a little and get off any splinters or nicks.
Next, rub on a coat of pre-stain conditioner. This helps the stain flow more evenly and helps prevent blotching. Do this both inside and outside of the Box.
After waiting the required time (like 30 min depending on what the can tells you to do), start rubbing the stain in! We used an old sock - why not?? We did make sure to wear gloves because stain stains. The number of coats is totally up to you, depending on how dark you want to go. We were happy with the color after two coats.
Once these are dry, spray everything really well with the Polyurethane sealer. Again, make sure you got an exterior-rated product. This will need a few coats and plenty of drying time in between coats, so be sure to block out a little bit of time for all of that. Get all the nooks and crannies inside and out! The better you seal, the more the wood will be protected, we did three coats.
Lastly, paint your Back Clamp Bar the same color as your railing. Alternatively, you could stain it the same as rest of the assembly. We just wanted the back of ours to blend a little better.
OK! Once the sealer and paint are both dry, reattach the support clips to the Cradle and re-mount the finished Cradle on to the rail!
Step 16: Finish 3 - Little Rope Handles


Once the Box is all sealed, you can now add some cute little rope handles! Totes adorbz.
Drive a drywall screw into the top of the corner posts so that they stick out 1/2" or so from the posts. Cut lengths of the clothesline and tie them onto these little studs. MAKE SURE YOU HAVE ENOUGH ROPE TO TIE A GOOD KNOT! We did not, and though they look good, the knots are totally too small to hold a box full of dirt. We will fix this later, we promise. Maybe. Once we get fed up with having to pick these up by the bottom or the top lip.
Step 17: Finish 4 - Plastic Lining


Don't try to do this in a hurry. Give yourself some time; it takes longer than it looks and is more frustrating than it seems.
Anyway, cut some lengths of 4-mil plastic sheeting that are about 14" long by however wide the inside dimension of your box is. Slide those through the drain gap in the bottom and fasten them with staples to the bottom of the board. My staple gun was all jammed up (frustration point 1), so I had to use a little office stapler. Not recommended, but I was in a hurry.
Next, run these lengths along the inside bottom and wrap up the front and back sides of the box, stapling at the inside corner between bottom and side and up at the top 1/2" or so underneath the top trim boards. Once they're secure, use a knife to cut the plastic off just below the top trim board. This is so there's minimal plastic showing when you fill the thing with dirt.
Once the front and back are done, remove your rope handles and get ready to wrap the sides. Cut some plastic lengths that correspond to the lengths of the sides of the box. Tuck these in and attach them to the sides, overlapping the front and back plastic sheets. Honestly, this is just going to take some fussing with (frustration point 2), especially if you just have a little office stapler. You'll also have to poke little holes in the plastic for the rope screws to poke through (frustration point 3). At the end of the day, it doesn't have to be perfect - it just has to cover all the wood, making sure that water won't get underneath it. No one will ever see this unless you're taking pictures of it to show all over on the internet.
After you've done the best you can, you can tie your handles back on and wipe your hands of the matter!
And there you have it. All of the construction is done! Guess what time it is.
Step 18: Fill!


Now that everything is all built, it's time to get things ready for the plants themselves.
Much of this may depend on the types of plants you're intending for this box. However, it's generally always a good idea to have a layer (1/2" - 1") of loose gravel at the base in order to facilitate good drainage.
From there, just fill in the soil to the top of your plastic. We made two boxes, and we used a little over one 25-qt bag of moisture control potting soil.
Then plant away! In one of our boxes we planted Oregano, Creeping Myrtle, Petunias, Purple Calibrachoa, and Mint. In the other, we planted Basil, Calibrachoa, Petunias, Creeping Myrtle, and Cilantro. So far, these have done pretty well on our partly-shaded southern-facing porch. But we are by no means botanists, so don't take our word for it!
Step 19: Enjoy!


Congratulations! You've just livened up your outdoor space! Now you can actually start to live in that space, not just occupy it. You've also increased the curb appeal of your home without having to permanently affix anything!
Most of all, you've done it yourself and can take a sense of pride and ownership in YOUR home, that YOU are building. Not bad for a few hours and less than $100 (including plants)!

Runner Up in the
Gardening Contest


