

Introduction: Creating a D&D 5e Character for Beginners!

Dungeons and Dragons is a pen and paper role-playing game published by Wizards of the Coast. Prior to playing a game of Dungeons and Dragons, you need to create a character. This task can be daunting, especially for new players. Below you will find a step by step process that will help you get ready for your first game. While all of the information included in this set of instructions can be found by reading the Player Handbook, they have been grouped together in a manner to efficiently fill out your character sheet. Most Dungeon Master’s will work with their players in the first session of their game, but in case they do not, then this set of instructions will help you be ready for your first game.
Material List:
- D&D 5e Character Sheet
- Official character sheets can be found at D&D's Official Website.
- D&D 5e Player's Handbook
- Alternately, you can use the official D&D Player Handbook Basic Rules PDF on D&D's Official Website.
NOTE - The free PDF does not include all the same material as the Player Handbook. It contains all the necessary information to create a character, just some of the options are limited.
- Alternately, you can use the official D&D Player Handbook Basic Rules PDF on D&D's Official Website.
- One d6 (or four d6 to speed up the process)
- Pencil
- Eraser
- Bookmarks (optional)
Keywords:
- RPG - Role Playing Game
- DM - Dungeon Master
- D&D, D&D 5e - Dungeons and Dragons, Dungeons and Dragons 5th Edition
- PHB - Player’s Handbook
- d4,d6,d8,d10,d20 - Various types of dice: d4=four sided die, d6=six sided die, etc
NOTE - When preceded by a number, such as 4d6, means four six-sided dice. - HP - Hit Points
- AC - Armor Class
- CP, SP, EP, GP, PP - Copper, Silver, Electrum, Gold, Platinum Piece (Various denominations of money)
NOTE - Throughout these instructions, page numbers are listed with the various steps where applicable. This is to give the reader an idea of where to look should they want to learn more about any various step. Whenever listed, the PHB page number is listed first as the primary number, which is followed by the PDF’s number in parenthesis. IE: page 90 (PDF 50)
=========================================================
Step 1: Choose Race, Class, and Background


Prior to filling out your character sheet, there are three things you should decide. You need to decide what race and class your character is going to be, as well as their background.
NOTE - It is highly recommended that you use a bookmark to mark where each of your chosen selections start, as you will need to reference each section multiple times. This will dramatically reduce the time needed to create a character.
Choose a Race
Race is your character's species. Your character's race helps determine your physical look as well as giving you natural talents. Racial traits include the following: Ability Score Increase, Age, Alignment, Size, Speed, Languages, and Subraces. You can read the first few paragraphs of each race's section to get an idea of what each of them are.
NOTE - Locate the "Racial Traits" section (Figure 1.1) inside your race's section. This section is referenced specifically in multiple other steps.
Choose one of the following races:
- Dwarf- Page 18 (PDF 12)
- Elf- Page 21 (PDF 13)
- Halfling - Page 26 (PDF 16)
- Human - Page 29 (PDF 17)
- Dragonborn - Page 32 (Not in PDF)
- Gnome - Page 35 (Not in PDF)
- Half-Elf - Page 38 (Not in PDF)
- Half-Orc - Page 40 (Not in PDF)
- Tiefling - Page 42 (Not in PDF)
Choose a Class
Class is your character's profession, and determines what actions your character can perform. Your character gains some special class features and proficiencies centered around their chosen vocation. You can read the first few paragraphs of each class's section to get an idea of what each of them are.
NOTE - Locate the "Class Features" section (Figure 1.2) inside your class's section. This section is referenced specifically in multiple other steps.
Choose one of the following classes:
- Barbarian - Page 46 (Not in PDF)
- Bard - Page 51 (Not in PDF)
- Cleric - Page 56 (PDF 20)
- Druid - Page 64 (Not in PDF)
- Fighter - Page 70 (PDF 24)
- Monk - Page 76 (Not in PDF)
- Paladin - Page 82 (Not in PDF)
- Ranger - Page 89 (Not in PDF)
- Rogue - Page 94 (PDF 26)
- Sorcerer - Page 99 (Not in PDF)
- Warlock - Page 105 (Not in PDF)
- Wizard - Page 112 (PDF 29)
Choose Background
Your character's background is simply your characters history. Where do they come from and what were they doing prior to the game you are about to play. They provide additional proficiencies, languages, and skills. You can read the first few paragraphs of each background's section to get an idea of what each of them are.
Choose one of the following backgrounds:
- Acolyte - Page 127 (PDF 37)
- Charlatan - Page 128 (Not in PDF)
- Criminal - Page 129 (PDF 38)
- Entertainer - Page 130 (Not in PDF)
- Folk Hero - Page 131 (PDF 39)
- Guild Artisan - Page 132 (Not in PDF)
- Hermit - Page 134 (Not in PDF)
- Noble - Page 135 (PDF 40)
- Outlander - Page 136 (Not in PDF)
- Sage - Page 137 (PDF 41)
- Sailor - Page 139 (Not in PDF)
- Soldier - Page 140 (PDF 42)
- Urchin - Page 141 (Not in PDF)
=========================================================
Step 2: Stat Blocks


The stat block is the main portion of sheet that influences the “game” part of the role-playing game. This block consists of your proficiency modifier, your ability scores and modifiers, and your skill modifiers.
NOTE - Each step below corresponds with the same number in Figure 2.1. A completed stat block is provided in Figure 2.2 as an example.
(1) Ability Scores:
Ability Scores are determined via two methods. You may roll dice to determine which numbers you have to work with, you can choose to use the default numbers. Also, your race applies some benefits to certain ability scores.
To determine you Ability Scores, do the following:
- Choose one of the following methods to generate your ability stats:
- Roll for stats
- Roll 1d6 four times, or roll 4d6 once. (End result should be 4 numbers)
- Drop the lowest number.
- Add the remaining three numbers together
- Write that number on a scrap piece of paper
- Repeat five more times, for a total of six numbers
OR
- Use predetermined stats
- You may assign each of these numbers once to one of the abilities: 15,14,13,12,10,8
.
- You may assign each of these numbers once to one of the abilities: 15,14,13,12,10,8
- Roll for stats
- Choose one number for each of the six abilities in space labeled (1) in Figure 2.1.
NOTE - Each class has a Quick Build section in the class information. This will tell you where to put your two highest scores. See Figure 2.3 as an example of what the Quick Build section looks like.
. - Reference your race section, and add Ability Score increases to the ability/abilities specified by your race.
NOTE - See Figure 2.4 as an example of what you are looking for in the book..
(2) Ability Modifier:
The Ability Modifier is the amount you would add to the dice roll as you are playing the game. If your modifier is a +2, and you rolled a 12, you final score for that check is 14. The higher your result, the better, and the number you are trying to beat is determined by your DM based on the difficulty of the task.
To determine the Ability Modifier, do the following:
- The modifier is determined by the Ability Score:
- Ability Score = Modifier
- 2-3 = - 4
- 4-5 = - 3
- 6-7 = - 2
- 8-9 = - 1
- 10-11 = + 0
- 12-13 = + 1
- 14-15 = + 2
- 16-17 = + 3
- 18-19 = + 4
- 20-21 = + 5
NOTE - See Figure 2.2 for an example.
(3) Inspiration:
Inspiration is not used in character creation. Your character may earn inspiration from other players or the DM in game, and is tracked here.
For now, leave this blank.
(4) Proficiency Modifier:
Proficiency Modifier is a bonus you add to any checks made with a skill or weapon you are proficient with. All characters start with a +2 proficiency modifier at level 1. This will increase as a character levels up. Reference your class section to see at what levels this increases.
- Enter a "+2" in the proficiency box.
(5) Saving Throws:
Saving throws are ability checks that you make when someone else is targeting you, such as a spell that you are trying to resist.
To calculate your saving throws, do the following:
- Determine which saving throws you are proficient in:
- Your class will determine which two saving throws you are proficient in. Reference your classes "Class Features" section.
- Fill in the circle next to the saving throws in which you are proficient.
.
- Calculate proficient saving throw modifiers:
- For all saving throws that your character is proficient, or has the circle filled in, you add the relevant ability modifier with your proficiency modifier.
EXAMPLE - If you had a Dexterity modifier of +3, and a proficiency modifier of +2, than your proficient saving throw of Dexterity +5.
.
- For all saving throws that your character is proficient, or has the circle filled in, you add the relevant ability modifier with your proficiency modifier.
- Calculate non-proficient saving throws:
- For the remainder of your saving throws, the modifiers are simply the relevant ability modifier as you do not add the proficiency modifier.
NOTE - See Figure 2.2 for an example.
- For the remainder of your saving throws, the modifiers are simply the relevant ability modifier as you do not add the proficiency modifier.
(6) Skill Scores:
Skill scores are ability checks that apply to specific scenarios. If you are trying to bluff someone, you would use Deception. If you are trying to tell if someone is bluffing, you would use Insight. These scores are added to any rolls you make for one of these scores.
To calculate your skill modifiers, do the following:
- Determine which skills you are proficient in:
- Reference both your class and your background to determine which skills you are proficient with.
- Fill in the circle next to the skills in which you are proficient.
.
- Calculate proficient skills modifiers:
- For all skills that your character is proficient, or has the circle filled in, you add the relevant ability score modifier with your proficiency modifier.
EXAMPLE - If you had a Charisma modifier of +3, and a proficiency modifier of +2, than your proficient skill of Deception is +5.
.
- For all skills that your character is proficient, or has the circle filled in, you add the relevant ability score modifier with your proficiency modifier.
- Calculate non-proficient skills:
- For the remainder of your skills, the modifiers are simply the relevant ability modifier as you do not add the proficiency modifier.
NOTE - See Figure 2.2 for an example.
- For the remainder of your skills, the modifiers are simply the relevant ability modifier as you do not add the proficiency modifier.
(7) Passive Perception:
Passive Wisdom is your characters natural awareness of their surroundings. When you are not actively looking for something, this score determines what you see without needing to make a check.
To calculate your Passive Perception, do the following:
- Passive Perception starts at 10
- Add or subtract your Perception skill bonus
.
EXAMPLE - If your Perception is a +1, then your Passive Perception is 11.
=========================================================
Step 3: Proficiencies and Languages


Determine what languages your character knows, as well as any additional proficiencies or bonuses not tracked in the main stat block. Each step below corresponds with the same number in Figure 3.1. A completed Proficiency and Language block is provided in Figure 3.2 as an example.
(1) Proficiencies:
Non-skill proficiencies are skills or items that you character can use without any penalties.
- List all proficiencies, such as armor and weapons. Also list all items such as kits and instruments. Make notes of any bonuses to proficient skills or items.
(2) Languages:
- Check BOTH your race and background for any known languages.
.
Note - Languages are listed on page 123 (PDF 34) if you have the option to choose a language.
=========================================================
Step 4: Equipment


Your equipment consists of all the items that they are carrying. This includes their armor, weapons, traveling gear, exploring gear, etc. There are two ways to create your starting inventory:
- Default Inventory:
- Your class has a list of starting items that you can transfer to your character sheet. Your background may provide additional items that can be added to character sheet.
- Purchase Inventory:
- Based on your character class, you can use the starting gold to buy any gear you like.
- Your starting gold is based on the table "Starting Wealth by Class" on page 143 (PDF 43).
- You may purchase any item from the tables on page 145, 149, and 150 (PDF 44, 46, 48).
Each step below corresponds with the same number in Figure 4.1. A completed Equipment block is provided in Figure 4.2 as an example.
(1) Equipment:
- List all equipment, weapons, armor and personal items.
(2) Money:
- Regardless of the method used, list any money you have remaining in the appropriate box.
=========================================================
Step 5: Attacks and Spellcasting


In combat, most characters either use physical attacks or they cast spells. Regardless, they also have access to special actions.
NOTE - For complete spellcasting breakdown and spells list, please reference your class section where applicable. This set of instructions does not go over all aspects of spellcasting.
Each step below corresponds with the same number in Figure 5.1. A completed Attack and Spellcasting block is provided in Figure 5.2 as an example.
(1) Physical Weapons:
Physical weapons are those such as staffs, swords, and bows.
- Write down the name of a weapon that you picked in Step 3. Repeat for everyone weapon you are carrying.
- Find the weapon in the weapon table on page 149 (PDF 46).
(2) Attack Modifier:
Attack modifier is the score you add to a d20 roll when attempting to attack with that weapon. You compare the final number to the targets AC, and successfully hit if your number is equal to, or greater than, their AC.
To determine your attack modifier for each weapon, do the following:
- Look up the weapon in the chart on page 149 (PDF 46).
- Make note if the weapon description has the keyword "finesse" or if the weapon has a "range".
- Make note if you are proficient with that weapon or not.
.
NOTE- Your proficiency might be for "Simple Weapons". This means you are proficient with ALL weapons in that category.
. - Calculate Attack Modifier:
- For ranged weapons you are proficient with:
- Take your Dexterity modifier and add you proficiency modifier.
- For ranged weapons you are not proficient with:
- Take just your Dexterity modifier.
- For melee weapons you are proficient with:
- Take your Strength modifier and add your proficiency modifier.
- For melee weapons you are not proficient with:
- Take just your Strength modifier
- For weapons with Finesse
- You may use either strength or dexterity, whichever you prefer.
- Add your proficiency modifier if you are proficient with that weapon.
- For ranged weapons you are proficient with:
(3) Damage:
Damage is the amount of damage you do to the target on a successful hit. To determine the damage dice and type, do the following:
- Write down the damage amount listed in the table on page 149 (PDF 46) in the form of the amount of dice you roll when you do damage.
.
EXAMPLE - 2d6 or 1d8.
. - Write down the Ability Modifier used to determine the Attack Modifer
.
EXAMPLE - If it is a ranged weapon and your Dexterity Modifier is +2, write "+2" after the dice amount.
. - Write down the Damage type that is listed after the total damage amount.
.
EXAMPLE - Piercing or Slashing.
(4) Special Actions:
- If you have any special abilities or combat actions you may list them here.
.
EXAMPLE - Sneak Attack for Rogues.
=========================================================
Step 6: HP and Combat Stats


This block contains various forms of combat stats along with your hit points, or health. Each step below corresponds with the same number in Figure 6.1. A completed HP and Combat Stats block is provided in Figure 6.2 as an example.
(1) Armor Class:
Determined by the armor that you are wearing and/or your dexterity modifier. Your Armor Class, or AC, determines how hard you are to hit in combat.
To calculate your armor class, do the following:
- If you are wearing armor, look up your armor in the table on page 145 (PDF 44).
- Follow the AC calculation in the table
.
NOTE - This may be a straight number, or it may be a number added to your Dexterity Modifier.
.
EXAMPLE - Chainmail is a straight 16 AC, where as Leather armor is 11 added to your Dexterity modifier.
.
- Follow the AC calculation in the table
- If you are not wearing armor, then your AC is 10 plus your Dexterity Modifier.
(2) Initiative:
Initiative is your ability to act quickly in the face of danger. When you roll for Initiative, you roll a d20 and add your initiative modifier.
To determine your initiative modifier, do the following:
- Your dexterity modifier is also your initiative modifier.
EXAMPLE - If your dexterity modifier is +3, you Initiative Modifier is also +3.
(3) Speed:
Speed is how far you can move with a single movement action.
To determine your movement, do the following:
- Check your race section in the Player's Hand Book for their speed.
(4) Hit Dice:
Hit dice determine how hearty you are, and your ability to heal when resting.
To determine your hit dice, do the following:
- The number of hit dice you have is determined by your level (These instructions assume level 1, so therefore 1 hit dice.)
- The type of hit dice is determined by your class. Check the class section of the Player's Hand Book.
.
EXAMPLE - A level 1 Rogue has 1d8, as Rogues have d8's as hit dice, and he is level 1 so he has one of them.
(5) Hit Point Maximum:
Your hit point maximum is the most HPs you can have.
To calculate you maximum HP at level 1, do the following:
- Take the maximum value of your hit die and add your Constitution modifier
.
EXAMPLE - A d8 hit die with a +1 Constitution modifier = 8 + 1 = 9 maximum hit points.
.
NOTE - As you level up, at each level you roll a hit die and add your Constitution modifier, and add that to your total hit points.
(6) Current Hit Points:
Current hit points is the amount of health you have remaining. This number can not go above your hit point maximum. You may use this block as you play the game to keep track of damage you have taken. If your current hit points ever reach 0, you become unconscious.
(7) Temporary Hit Points:
Temporary Hit Points are not used in character creation. Spells and other buffs give you temporary hit points. These can not be healed, and act more of as a buffer for your current hit points.
For now, leave this section blank.
(8) Death Saves:
Death Saves are not used in character creation. The are used when characters reach 0 HP when playing the game, and are the bases of determining if a character is just knocked out or is actually dead.
=========================================================
Step 7: Features


Figure 7.1 is the Features block. A completed Features block is provided in Figure 7.2 as an example.
(1) Features:
The features block is a place to list all remaining features of your class, race, and background. Any additional skills, passive benefits, or relevant bonuses from background can be listed here.
=========================================================
Step 8: Traits


Traits are descriptions for you character. These traits directly feed the role-playing aspect of the role-playing game. Each trait below corresponds with the same number in Figure 8.1. A completed Trait block is provided in Figure 8.2 as an example.
Choosing your traits:
There are two methods to pick your traits. Choose one of the following:
- Look up your background
- Roll the appropriate die based on the tables in your background description.
.
NOTE - Each table may be a different type of dice, so double check the die needed.
.
OR
. - Make up your own using the book options as examples.
- Roll the appropriate die based on the tables in your background description.
- Fill in the following sections with your choices:
(1) Personality traits:
General descriptions about your character, that help differentiate different characters from each other.
(2) Ideals:
Ideals are the things that your character believes strongly in.
(3) Bonds:
How your character is tied to the world of the game. Can be a person, place or event.
(4) Flaws:
A vice, compulsion, fear, or weakness.
=========================================================
Step 9: Name and Remaining Information


Now that you have a good handle on who your character is, all that is remaining is a few last decisions. Each step below corresponds with the same number in Figure 9.1. A completed Name block is provided in Figure 9.2 as an example.
(1) Character Name:
The name that your character goes buy.
You can find a name from one of the following places:
- Each Race section in the Player's Handbook has sample names you can choose from.
- Can look online for a fantasy name generator.
- Make up your own name.
(2) Class and level:
A place to track your class and level.
- Write your class followed by 1 as you are starting at level 1.
(3) Background:
A place to write your chosen background.
(4) Player name:
A place to write your own name.
(5) Race:
A place to write your chosen race.
(6) Alignment:
Alignment is your general temperament to others and the world around you.
To select your alignment, choose from the following:
- Reference your Ideal trait, and choose an alignment that works with the alignment suggestion at the end of the chosen trait.
.
AND/OR
. - Choose from the list on page 122 (PDF 33 and 34).
(7) Experience points:
You start at 0 Experience points. As you play the game, you will earn more. At certain amounts, you will gain a level which may increase your ability scores, or give you more features or actions. Keep track of your experience points here as you earn them.
=========================================================
Step 10: Review
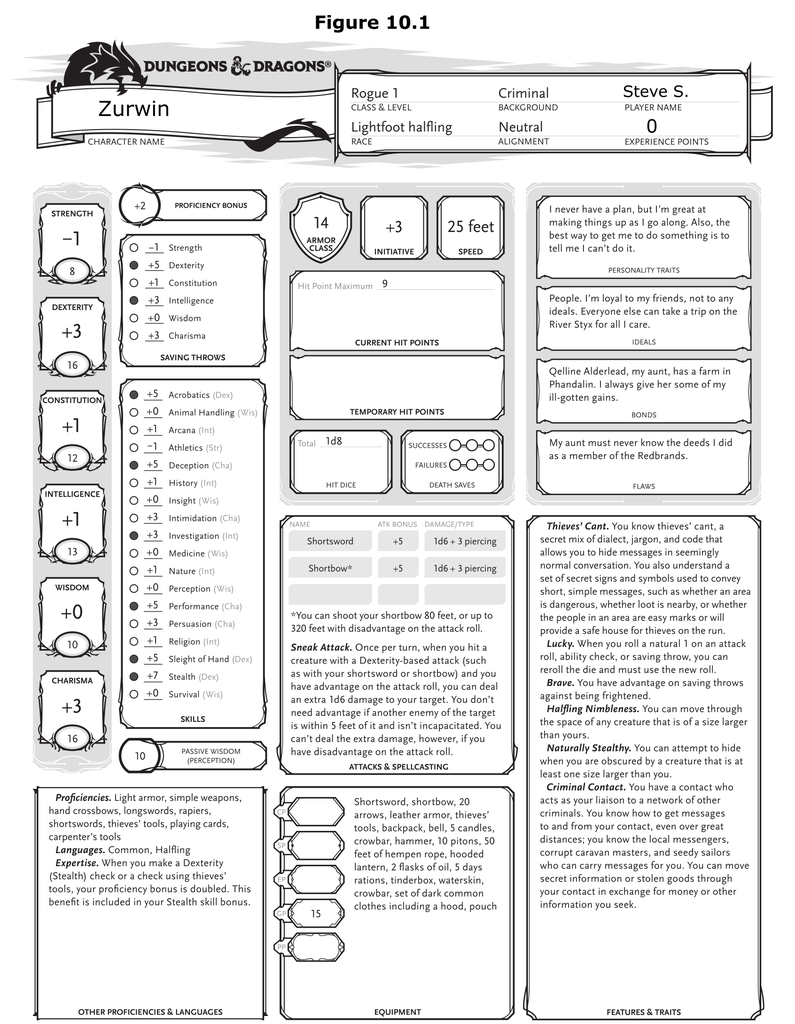
Review your character sheet for any missing information. While most of the information will be different, you can compare your sheet to Figure 10.1 to see if you are missing anything.
Congratulations! You are now ready to play. Your party and DM should help you with any questions you have regarding your character, and will continue to assist you as you learn to play the game. They should also help you update you character sheet as you gain levels.


