

Introduction: Making a Racing Motorcycle Chassis


In the early 1970s I built a frame for my racing motorcycle to house a 350 cc Aermacchi engine (HD sprint in the US).
In 2006 after being away from the track for 30 years I started racing again in classic races in the US and I built a close replica of my 1970s bike in 2008/2009. This Instructable, which is an entrant in the “Metals contest”, describes how I built it mainly through photos which generally show more than words can. The above photos show the orinal 1970s bike and the other shows the new one being exercised at Loudon in NH, USA. in 2010.
Step 1: Tools and Materials


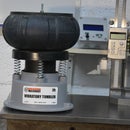
I will not give a detailed list of the materials used because that will be obvious from the descriptions in each step. As always tools used depend so much on the facilties available to an individual builder but what I used will become apparent as the build proceeds. I will describe one tool though before we start because many readers may not have see one. That is what is called an optical table. I managed to buy it from a laser optics company that was downsizing. From the photo it can be seen that it has a lot of depth which keeps it rigid. The top is stainless steel to a flatness tolerance well within that needed for the task. It also has the top drilled on a 1” (25.4 mm) spacing and tapped ¼ “ unc. These holes are very handy for holding parts and fixtures/jigs securely to the table.
I used this table as an accurate and solid base for aligning the frame during construction. I have never liked the common type of frame jigs used by many people who have made frames. This common type mounts the frame in the orientation that the frame will assume when on the road as a complete motorcycle. This type of jig usually has a horizontal base with a tall vertical piece to hold the steering head. I find this type of jig to be lacking rigidity and accuracy. On the other hand I find these problems a non-issue when using a solid flat base like the optical table or a large enough surface plate and I have used the bed of an old flat lathe as well in the past.
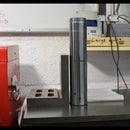
The second photo shows the simplicity of some of the fixtures which are used in conjunction with the table.
Step 2: First Steps

The construction of this frame was largely composed of steel tubes welded together, but at the rear of the engine there are two 12 mm thick 6061 T6 aluminium alloy plates which give support to the rear swinging arm and footrests. If I had a bandsaw at the time I would have cut the plates out with that, I did not but I was able to use a CNC milling machine. I wrote a simple Gcode programme and cut them out that way. The mill also made it very easy to drill and ream various holes equally located on each plate.
Step 3: Making the Head Stock


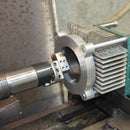
The head stock is a part which holds the two steering bearing to which the front forks are mounted. Usually it is made from some relatively thick walled steel tube. It order to save weight I wanted to waist the centre section down. To do this I machined it from a solid bar of 4130 Cr.Mo alloy steel. The photos show the main steps and the finished part. The large diameter end sections are bored to take the steering bearings. Pieces always distort to some extent when welding and so I always leave the bores undersize until the frame is finished and then do the finish machining which is described later.
Step 4: Preparing the Tube Fitting.


When round tubes are welded together it is usually necessary to prepare the tube ends to get a nice fit. This process goes by many names such as fish mouthing or tube profiling which is what I call it.
There are many ways to do this, for example you can make or buy holding fixtures to permit the use of a hole saw in a manual drill, drill press or milling machine. You can also saw close to the shape and finish with a file or grinder. You can find freeware programmes on the net which enable you to print out templates to wrap around the tube as a cutting guide.
However for tubes of the size that I used, 22 and 19 mm I prefer to use a milling cutter of the same size as the tube to which the tube being cut will fit. To make it quick, simple and secure I made clamping fixtures from some scrap aluminium blocks. These blocks were relieved such that the vice pressure acted directly across the tube to ensure secure clamping. The blocks could be mounted at any angle in the vice, so I only had to set them with a digital angle level to get a perfectly fitting joint.
Step 5: Profiling the Tubes.


The photos say it all. Note how little “stick out” there is when machining. This ensures the greatest possible rigidity and accuracy.
Step 6: The Fun Part Begins

I get to do some welding.
The tubing is 4130 Cr.Mo. Both 1 mm and 1.5 mm wall thickness, depending on the loading of each tube. I used what I and most British old timers call bronze welding but which is more commonly known as brazing in the US. The heat is supplied by an oxy-acetalene torch and the filler rods are manganese bronze which melt at a slightly lower temperature than the more usual nickel-bronze. There are three main reasons for preferring bronze welding over fusion welding for this type of structure;
The steel tube is heated to a lower temperature than fusion welding which helps retain its strength.
The fillets are usually made with a larger radius and that reduces stress concentration.
The bronze is more flexible and that softens the loads a little further reducing the tendency to fatique.
I do not have a photo of the welding of this frame but shown is a picture of an earlier frame that I prepared for a friend.
Step 7: Starting the Structure.


Aluminium plates attach to the tubular structure through one cross tube. If that was done with a cap screw through a parallel drilled hole then over time and use I can guarantee that the holes will loosen and accurate location will suffer. To avoid that in these cases I countersink the plate and make steel bosses with a matching angle which get welded to the cross tube as shown in the photos. After welding the bosses, they get finish machined in a lathe and the ends are drilled and tapped M10 for clamping bolts. When clamped up the taper fitting ensures accurate and rigid connection.
Step 8: The Base of the Frame.


The easiest way to make this piece and to ensure that it will fit the engine properly is to use a pair of crankcases as the jig. This is the only part that does not use the optical table for alignment.
Step 9: Adding Some Shape.


The next stage was done using the optical table and some very simple fixtures to hold it square and level. The fixtures were machined and drilled in the mill to ensure accuracy. Although I have the pictures above showing the sub assembly tacked together I am unable to find any pictures of the jigging for this part. It simply consisted of two matching plates on each side to hold the upper tube in place. The second picture above just shows the sub-assembly on the crankcases purely as a progress photo.
Step 10: Somewhere to Sit.


Now it is time to add the seat tubes and rear sub-frame. For this operation the sub-assembly is orientated as it would be on the road. This makes it very easy to align the seat tubes by using some spacing blocks to hold the ends of the tube at the required height. This was a one off construction and so where simple fixturing was appropriate I was happy to go that route.
Step 11: Fitting and Checking.


The first photo shows the close fitting that the profiling gave, note that the top tube was profiled in two directions one to mate with the top cross tube and the other to match the diagonal. The second photo shows the assembly being checked with a vernier height gauge.
Step 12: Re-orientation.


Up until now the frame was orientated as it will end up on its wheels but I like to bolt the head stock at right angles to the table to ensure rigid alignment, this means that the rest of the frame must be tilted forward by an angle equal to the angle of the forks (called the rake angle) when on its wheels. To do this I raised the rear by an appropriate amount using taller side plates as shown in the photos. One photo shows the headstock clamped in position. The grid of holes in the table makes alignment very easy.
Step 13: Joining the Dots.

The next stage entailed fitting the tubes connecting the finished rear sub-frame to the head stock. A frame is pretty useless for racing unless the headstock axis is accurately aligned at right angles to the pivot in the plates for the swingarm. As I have already mentioned, welding always causes distortion. If I had welded all the tubes at this stage then it would be most likely that it would be out of alignment as soon as it was released from the jig. I know that many frame builders cannot fit finished frames back into a jig with any accuracy. To avoid such problems I always weld in the head stock after all other welding is done and has been allowed to cool. That way any distortion is done before the head stock is welded and that rarely causes much movement. The photo shows all the dots connected although the head stock has not been welded the other tubes have been tacked and now the frame will be removed to get good access to finish weld all the joints.
Step 14: Welding the Tubes.


The previous step described the reasons for welding the head stock last. The next step describes in detail how distortion is minimised. This step shows the pre-headstock welding.
The upper tube has no bracing until welded to the head stock so I clamped a plate between upper and lower tubes during the welding, off the jig, to keep them aligned. That worked well.
Step 15: The Finish in Sight.


The frame was placed back in the jig and I checked to see that distortion was not forcing the frame against the headstock. There was a little bit of interference and I removed the frame from the jig to file the areas applying the pressure. After two or three fittings the head stock was free without any binding. I tacked the head stock top and bottom which completed the structure and prevented and significant misalignment from the final completion welding. Once cool and removed from the table it would fit back onto the fixtures perfectly. In the 1970s and 80s I made several frames of different types and always used the same guiding principles to ensure alignment.
Step 16: Milestone Achieved.


The structure completed.
Step 17: It Is Not Over Yet.


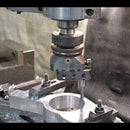
I mentioned that I always finish machine the bearing bores after the frame is welded. To achieve this I mount the frame on a milling machine table with the same fixtures that I used on the optical table. This make sure that the frame is aligned perfectly for boring. An adjustable boring head makes it easy to bore accurately to size.
Step 18: Do Not Forget the Bottom Bore.

I had no fixtures to hold the frame true for the bottom bore but when doing the top one I machined the top surface so that it was square to the bore. That gave a true surface which held the head stock in alignment when it was clamped down onto the table. To relieve the force on the head stock from the overhung frame I positioned it so that the seat tubes just touched the table, hence taking the overhung weight of the frame.
Little things make a difference.
Step 19: What Next.


We need some way of holding the forks, these are clamps know as fork yokes. I made these from some pieces of 6061 T6 that I had in the recycle bin.
I rough cut them out with a chop saw with a fine wood cutting blade. And then finished them in the CNC milling machine.
Step 20: Post Yoke Machining


After machining the yokes a steel stub for the bearing was pressed into each yoke. A spacer was made such that a little preload was placed on the bearings when everything was clamped up. that required careful measuring. A 10mm clamping rod connected top and bottom yokes.
Step 21: Now for the Rear End.


We are not going anywhere without something to hold the rear wheel and suspension. This is called the swingarm and is another welded structure. Like the main frame only simple but carefully aligned fixtures were needed to hold the parts in place for the welding.
Step 22: Swingarm Design.


The swingarm consists of three main pieces, A cross tube at the front which is bored to take the pivot bearings, and two side tubes. The front is also strengthened with a sheet metal gusset and brackets are added near the rear for mounting the shocks.
Note that the two side tubes are a composite of round and rectangular tube. This is a result of the rules for the class of racing which dictate a round tube. The rectangular wheel mounting ends were deemed acceptable. Without such a rule each arm would have been totally made from rectangular tubing.
Step 23: Shock Mounts.


With the main part of the swing arm welded together it only remained to add brackets for the shocks. The photos show the simple jigging to hold those in position. Firstly only the outer plates were held in place by a couple of uprights bolted to the table. Then those plates were used in conjunction with some threaded rod and spacers to hold the inner plates at the correct spacing for the shock fixing.
Step 24: Finishing the Job.


As with the headstock I finish machine the bearing bores after all the welding is done. To hold the arm in the mill I clamped two large V-blocks to the table and then clamped the bearing tube to the V-blocks to keep the tube inline for boring. It was a simple matter to turn the swingarm over to do the second side.
Step 25: All Done.


The rough appearance to the edges of the welds is flux residue. Many people use what is called a gas fluxer for supplying flux to the weld via the gas flow to the welding torch. This requires very little cleaning after welding. I am a bit old school and I do not like the gas fluxer very much instead I use a heated welding rod dipped into a tin of powdered flux. This technique leaves a hard residue of flux, as seen in the photos, which must be cleaned off. Sand blasting the finished parts is the easiest way to remove this flux residue.
Step 26: Fun Time.


Here we see the initial test fitting of the engine and other parts. The other photo shows what it is all about.
Step 27: The Spoils of War.


2009 AMA grand national champion in the 500 cc class.
If you liked this instructable please vote for it in the metals contest. Thanks.
Runner Up in the
Metal Contest


